The Vietnamese Soup Pho is one of my favorite meals. You can buy a great Pho at Tu Do Vietnamese Restaurant at 7130 North Davis Highway, Pensacola, Fl. - OR - you can make your own. I have eaten Pho many times at Tu Do and it is always excellent, at a very reasonable price. I am still after my third try, trying to make it myself to the same excellence as Tu Do. Can't say that I have reached that point yet, but I'm still trying because I like the trip to Bien Dong and I like the experience in the kitchen. If you want to learn to make Pho, Bien Dong on Mobile Highway in Pensacola is the place to go for your ingredients. Tucked away in the back corner of the market is a small butcher shop where if you talk to the owner, he will get you just what you need for either chicken or beef Pho.

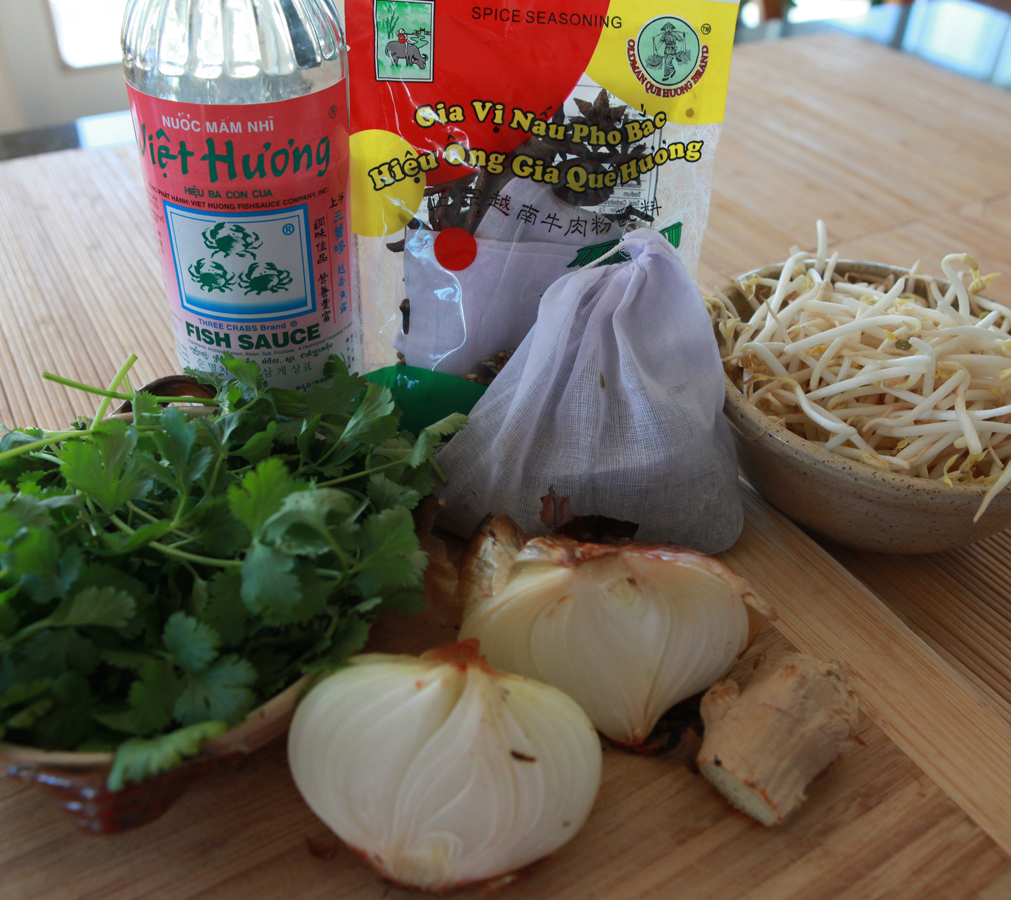
The recipe below is the basic recipe I used the last two times I made this but for the spices listed, (coriander and cloves) I used a bag of spices shown in this photo. It has both coriander and cloves in it but it also has star anise, fennel and a few pieces of bark I have not identified. The owner of Bien Dong suggested that be used.
One weekend, especially a cold one, give this a try. The recipe below is one of many you can find - I'm sure that there are dozens and dozens of versions of Pho. The main thing to remember is that the broth must be clear, either beef or chicken. That means a quick boil of the meat, discard the water, add fresh water and seasoning and skim all foam that comes to the surface. If you like this soup as much as I do and start making it, it seems that it will be a one of those recipes that evolve over time to just the way you like it. Hope you enjoy!
Chicken Pho Recipe (Phở Gà ) this recipe from http://vietworldkitchen.typepad.com/blog/2007/06/chicken_pho_noo.html
While beef phở may be the version that most people know and like, chicken phở is also excellent. In recent years, there has been a renewed interest in phở gà (pronounced "Fuh Gah")within the Vietnamese American community, and a handful of restaurants are specializing in the delicate noodle soup. Some of them use free-range gà chạy or gà đi bộ (literally “jogging chicken” or “walking chicken”), yielding bowls full of meat that has a flavor and texture reminiscent of traditionally raised chickens in Vietnam.
If you want to create great chicken
phở yourself, take a cue from the pros and start with quality birds. If you have never made
phở, this recipe is ideal for learning the basics. It calls for fewer ingredients than other
phở recipes, so you can focus on charring the onion and ginger to accentuate their sweetness, making a clear broth, and assembling steamy hot, delicious bowls. While some cooks flavor chicken
phở broth with the same spices they use for beef
phở, my family prefers using coriander seeds and cilantro to distinguish the two. To compare chicken with beef
phở, see my
beef pho noodle soup recipe.
Serves 8
Broth
2 yellow onions, about 1 pound total, unpeeled
Chubby 4-inch section fresh ginger, unpeeled
1 chicken, 4 pounds, excess fat and tail removed
3 pounds chicken backs, necks, or other bony chicken parts
5 quarts water
1 1/2 tablespoons salt
3 tablespoons fish sauce
1-inch chunk rock sugar* (about 1 ounce)
2 tablespoons coriander seeds, toasted in a dry skillet for about 1 minute until fragrant
4 whole cloves
1 small or 1/2 large bunch cilantro (bound stems about 1 inch in diameter)
Bowls
1 1/2–2 pounds small flat rice noodles (bánh phở), dried or fresh
Cooked chicken, at room temperature
1 yellow onion, sliced paper-thin, soaked in cold water for 30 minutes and drained
3 or 4 scallions, green part only, thinly sliced
1/3 cup chopped fresh cilantro, leafy tops only
Black pepper
Optional garnishes
3 cups bean sprouts (about 1/2 pound)
10 to 12 sprigs mint (húng) 10 to 12 sprigs Thai basil* (húng quế)
12 to 15 fresh culantro* (ngò gai) leaves - (MB uses cilantro)
2 or 3 Thai or serrano chiles, thinly sliced
2 or 3 limes, cut into wedges
Make the pho broth
1. Place the onions and ginger directly on the cooking grate of a medium-hot charcoal or gas grill (as pictured, to the right) or a gas stove with a medium flame, or on a medium-hot burner of an electric stove. Let the skin burn (if you’re working indoors, turn on the exhaust fan and open a window), using tongs to rotate onion and ginger occasionally and to grab and discard any flyaway onion skin.
After 15 minutes, the onions and ginger will have softened slightly and become sweetly fragrant. There may even be some bubbling. You do not have to blacken the entire surface. When amply charred, remove from the heat and let cool.
2. Rinse the cooled onions under warm running water, rubbing off the charred skin. Trim off and discard the blackened root and stem ends. Use a vegetable peeler, paring knife, or the edge of a teaspoon to remove the ginger skin. Hold it under warm water to wash off any blackened bits. Halve the ginger lengthwise and bruise lightly with the broad side of a cleaver or chef’s knife. Set the onions and ginger aside.
3. Rinse the chicken under cool water. Detach each wing by bending it back and cutting it off at the shoulder joint. Add the wings and neck, if included, to the chicken parts. If the heart, gizzard, and liver have been included, discard them or save for another use. (Some cooks like to simmer the heart and gizzard in water and slice them for adding to the noodle bowls.) Set the wingless chicken aside.
4. Remove and discard any loose pieces of fat from the chicken parts. Wielding a heavy cleaver designed for chopping bones, whack the bones to break them partway or all the way through, making the cuts at 1- to 2-inch intervals, depending on the size of the part. This exposes the marrow, which enriches the broth.
5. To achieve a clear broth, you must first parboil and rinse the chicken parts. Put them in a stockpot (about 12-quart capacity) and add cold water just to cover. Bring to a boil over high heat and boil vigorously for 2 to 3 minutes to release the impurities. Dump the chicken parts and water into the sink (make sure it is clean), and then rinse the parts with water to wash off any clinging residue. Quickly scrub the stockpot clean and return the chicken parts to the pot. Put the chicken into the pot, breast side up.
6. Pour in the water and snuggle the chicken in between the parts so that it is covered with water. Bring to a boil over high heat and then lower the heat to a gentle simmer. Use a ladle or large, shallow spoon to skim off any scum that rises to the top. Add the onions, ginger, salt, fish sauce, rock sugar, coriander seeds, cloves, and cilantro and cook, uncovered, for 25 minutes, adjusting the heat if needed to maintain a gentle simmer.
At this point, the chicken is cooked; its flesh should feel firm yet still yield a bit to the touch. Use a pair of tongs to grab the chicken and transfer it to a large bowl. Flush the chicken with cold water and drain well, then it set aside for 15 to 20 minutes until it is cool enough to handle. Meanwhile, keep the broth at a steady simmer.
7. When chicken can be handled, use a knife to remove each breast half and the whole legs (thigh and drumstick). Don’t cut these pieces further, or they’ll lose their succulence. Set aside on a plate to cool completely, then cover with plastic wrap and refrigerate; bring to room temperature before assembling the bowls.
8. Return the leftover carcass to the stockpot and adjust the heat to simmer the broth gently for another 1/2 hours. Avoid a hard boil, or the broth will turn cloudy.
9. Strain the broth through a fine-mesh sieve (or a coarse-mesh sieve lined with cheesecloth) positioned over a pot. Discard the solids. Use a ladle to skim as much fat from the top of the broth as you like. (To make this task easier, you can cool the broth, refrigerate overnight, lift off the solidified fat, and then reheat before continuing.) Taste and adjust the flavor with additional salt, fish sauce, and rock sugar. There should be about 4 quarts (16 cups) broth.
Assemble the pho bowls
10. If using dried noodles, cover them with hot tap water and let soak for 15 to 20 minutes, or until they are pliable and opaque. Drain in a colander. If using fresh rice noodles, untangle them, place in a colander, and rinse briefly under cold running water.
11. Cut the cooked chicken into slices about 1/4 inch thick, cutting the meat off the bone as necessary. If you don’t want to eat the skin, discard it first. Set the chicken aside. Ready the yellow onion, scallions, cilantro, and pepper for adding to the bowls. Arrange the garnishes on a plate and put on the table.
12. To ensure good timing, bring the broth to a simmer over medium heat as you are assembling the bowls. (For an extra treat, drop in any unused white scallion sections and let them poach in the broth. Add the poached white scallion sections (called hành chần) to a few lucky bowls when ladling out the broth.) At the same time, fill a large pot with water and bring to a rolling boil.
For each bowl, place a portion of the noodles on a vertical-handle strainer (or mesh sieve) and dunk the noodles in the boiling water. As soon as they have collapsed and lost their stiffness (10 to 20 seconds), pull the strainer from the water, letting the water drain back into the pot. Empty the noodles into a bowl. If you like, once you have finished blanching the noodles, you can blanch the bean sprouts for 30 seconds. They should wilt slightly but retain some crunch. Drain and add to the garnishes.
13. Top each bowl of noodles with chicken, arranging the slices flat. Place a mound of yellow onion in the center and then shower some scallion and cilantro on top. Finish with a sprinkle of pepper.
14. Raise the heat and bring the broth to a rolling boil. Do a final tasting and make any last-minute flavor adjustments. Ladle about 2 cups broth into each bowl, distributing the hot liquid evenly to warm all the ingredients. Serve immediately with the garnishes